Simple No-Bake Cheesecake

Who doesn’t love a good cheesecake?! (If you don’t, you’re crazy) This recipe is so simple yet so delicious. It is for a no-bake cheesecake so all you have to do is mix some ingredients together then throw it in the fridge! It is a basic, plain cheesecake so feel free to add any flavourings or other tasty ingredients to it and let us know how you got on!

470_2687941

Ingredients

  • 300g plain digestive biscuits
  • 200g melted butter
  • 20g butter
  • 250g cream cheese
  • 175ml double cream
  • 80g icing sugar

Method

  1. Use the 20g butter to line the cake tin you are going to make your cheesecake in.
  2. Put all the biscuits into a food bag and crush the biscuits with the end of a rolling pin, or something similar, until the biscuits are crumbs.
  3. Meanwhile, melt the 200g butter.
  4. Put the crushed biscuits into a mixing bowl and add the melted butter. Stir the butter through the biscuit until you have a thick mixture.
  5. Put the crumb mixture into your cake tin and press down with the back of a spoon to form your base. Place in the refrigerator to set.
  6. Add cream cheese to a mixing bow, add the double cream and whisk until you have a thick, creamy mixture.
  7. Add the icing sugar into the bowl and stir well until you have a smooth, thick mixture.
  8. Take your cake tin base and spoon your mixture onto it, smoothing with as you go.
  9. Finish off by adding your toppings and place in the fridge to set (I leave mine overnight).

Tips

  • If you want to add any flavourings, fruit etc, add them to the mixture along with the icing sugar at stage 7.
  • The first time I made this cheesecake, I found the biscuit base too thick in comparison to the topping. If you don’t like too much biscuit in your cheesecake, I would recommend either cutting down the amount of biscuit base, or increasing the filling.

Let us know how you got on with this recipe and share with us any tips/other recipes you love!

10 Utensils Every Baker Needs!

I don’t know about all of you, but when I first started baking I bought every utensil, cake tin, gadget I saw. You name it, I’ve probably had it at one point. As time goes by and you bake more and more, you realise most of those ‘must-have’ things are a complete waste of money. Since getting rid of them, I now actually have free space in my baking cupboard, no more avalanche every time I open the door!

Here are 10 things I really do find essential for any baker, amateur to professional, and a few others that are essential to me.

1. Oven thermometer- no matter how new your oven is, the temperature could still be off even by a few degrees and those few degrees could be the difference between delicious and burned.

Oven Thermometer 5 - 091547

2. Timer- Most ovens come with a timer now but if yours doesn’t, you really should invest in one. They are great for when your items need  a few more minutes, especially if you’re a wee bit forgetful like me.

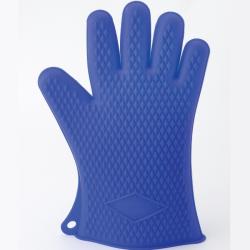
3. Good quality oven gloves/mitts- this seems like an obvious one but a lot of people end up using a folded towel instead, which means burned fingers. Even if you don’t bake regularly, it’s still something you should have in your kitchen. You can buy silicone gloves now too, I’ve not tried them yet but I’ve heard great reviews.
P13095281

4. Cooling racks- Everything that is baked in the oven has to be cooled properly afterwards, or it will continue to bake in it’s tin. The cooling rack has to allow air to completely surround the tin. If you bake a lot, it’s a good idea to have a few of these.

5. Good quality scales- these really are essential to everything you bake. If your ingredients are even a few grams out, it could mess up the entire recipe. In my opinion, digital scales are the best as they give you the exact amount, and they take up less room!

81ajiLgShDL

6. Measuring spoons- thesea re just as essential as scales, and are better for smaller amounts.

85114_1024_3000_3000_100409093852

7. Mixing bowls- it’s handy to have multiple mixing bowls, especially different sizes. That way you can have everything weighed out before you actually start baking.

1999-A550_HighRes_ZakDesigns

8. Sieve- most people will already have a sieve in their kitchen but a lot of people don’t bother using it because they think it doesn’t make a difference, or it makes too much mess. Sieving your dry ingredients before baking is crucial to most recipes as it adds aeration to the product.

9. Good quality baking pans/tins/sheets- this is another obvious one but one of the most important. No matter how perfect your recipe/oven/method is, if your baking equipment is too thin/too old/damaged, it will affect your product.

10. Bowl scraper- this is such a simple, cheap tool but it is great. It can be used to scrape down the mixture in your bowl to make sure it’s all mixed together properly. It can also be used to scrape your mixture into your baking pan. A spatula can also be used, but I prefer a scraper because you have more control over it.

e401

Some extra things that aren’t essential to everyone, but can be handy:

1. Stand mixer- I love my stand mixer. If you bake a lot at home it’s the perfect gadget! Stick your recipe in to mix while getting pans ready/cleaning up etc. If you bake a lot, I definitely recommend investing in a good mixer.

68453

2. Candy thermometer- If you fancy trying your hand at making caramel/candy/marshmallows or basically anything that requires cooking sugar, a candy thermometer is a very handy tool to have. It gives you the exact temperature of the sugar and tells you the different boiling points for jam, caramel etc.

Sugar-Candy-Thermometer-G911-

3. Palette knife- this is a handy tool for coating cakes with icing, but it can also be used to remove cookie from sheets and removing cakes/loaves from pans. Small, angled palette knives are also great for using with cupcake icing or sugar decorations.

7008807_499899141

4. Spring action ice cream scoop- this might seem a strange one, but if you bake cupcakes or cookies a lot, it’s a great wee tool to have. It ensures that each cake/cookie is the same size and it’s a quicker method than using a spoon or piping bag.

ice-cream-scoop

If you have any other tools you think are essential, let us know!

Bonfire Night

The chances are on Bonfire Night, most of us will either go to someone’s house to watch the fireworks, or have everyone round to ours for the night. There are also the hordes of people who go to nearby firework displays. No matter what you’re doing that night, here are a couple of delicious recipes that you can whip up for everyone to enjoy!

Toffee Apples

5fecb7ef5069c4b11e0df93ab4ef62c4

timthumb

Ingredients

  • 8 apples (we use Granny Smith)
  • 400g golden caster sugar
  • 1tsp vinegar
  • 4tbsp golden syrup

Method

  1. Place the apples in a large bowl, then cover with boiling water (you may have to do this in 2 batches). This removes the wax coating and helps the toffee to stick. Dry thoroughly and twist off any stalks. Push a wooden skewer or lolly stick into the stalk end of each apple.
  2. Lay out a sheet of baking parchment and lightly grease it. Place the apples on this, close to your stovetop.
  3. Tip the sugar into a pan along with 100ml water and set over a medium heat. Cook for 5 minutes until the sugar dissolves, then stir in the vinegar and syrup. Set a sugar thermometer in the pan and boil to 140C or ‘hard crack’ stage (If you don’t have a thermometer you can test the toffee by pouring a little into a bowl of cold water. It should harden instantly and, when removed, be brittle and easy to break. If you can still squish the toffee, continue to boil it).
  4. Working quickly and carefully, dip and twist each apple in the hot toffee until covered, let any excess drip away, then place on the baking parchment to harden. You may have to heat the toffee a little if the temperature drops and it starts to feel thick and viscous.
  5. Leave the toffee to cool before eating. These can be made up to 2 days in advance and stored in a dry place.

Tip

If you want blood red toffee like the picture above, simply add red food colouring into your sugar along with the vinegar and syrup. A tablespoon should do but add more if needed.

 Marshmallow Campfire Cupcakes

recipe-image-legacy-id--363988_11

Ingredients

  • 140g light muscovado sugar
  • 100g self-raising flour
  • 50g cocoa powder
  • 1tsp baking powder
  • 3 eggs
  • 125ml vegetable oil
  • 3tbsp milk
  • 50g milk chocolate chips
  • 30g pack mini marshmallows

Method

  1. Heat oven to 180C/160C Fan/Gas 4. Tip the sugar, flour, cocoa and baking powder into a large bowl.
  2. Whisk together the eggs, vegetable oil and milk, then stir together with the dry ingredients until well combined. Add the milk chocolate chips and mix together.
  3. Place cupcake cases into a 12-hole bun tin. Divide the mixture between the cases, then bake for about 20 minutes until risen and cooked through. Leave to cool. At this stage, once completely cool, these can be stored for up to 2 days in an airtight container.
  4. Just before serving, arrange marshmallows over the tops of the cakes. Heat grill to medium and pop the cakes under it for about 30 seconds (keeping an eye on them!) just until the marshmallows are lightly browned. Remove and eat straight away.

We hope you enjoy these recipes and have a safe Guy Fawkes Night everyone!