Using Sugarpaste
Covering a cake with sugarpaste/ready to roll icing/fondant can seem scary if you’ve never tried it but once you know how to do it, it isn’t as difficult as you’d think. In this post, I’ll explain each step to show you how to cover your very own cake, and give you little tips that I find useful.
For me, outside of cake school exams, I have never used marzipan on my cakes, I always use buttercream. If you want to use marzipan, however, here is a link to a helpful video to show you how it’s done: http://www.youtube.com/watch?v=7cPP-IulcKs. As mentioned at the end of this video, you can go on to cover your marzipan cake with sugarpaste. The method is the exact same as covering a buttercream cake.
Tools You Will Need
- 1 freshly baked cake (I would recommend using a 6-8 inch cake if this is your first time using sugarpaste (the smaller the cake, the easier it is to cover)
- Buttercream
- 2 cake boards/drums, 1 the same size as your cake and 1 a few inches larger

- 1 serrated knife/cake leveller
- 1 large palette knife
- 1 icing scraper/dough cutter


- 1 large rolling pin
- 1 measuring tape/ruler
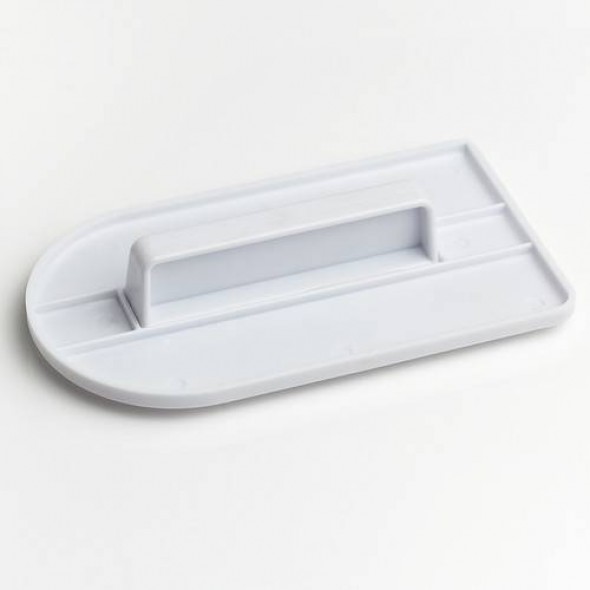
- 2 cake smoothers
- 1 sharp knife/pizza cutter
- small pins
- small cup of water and a brush
Method
- Put your cool, freshly baked cake into the fridge to firm up. I usually leave mine in for a few hours, or overnight just to ensure it is firm enough.
- Once it is firm, take it out of the fridge. Using your serrated knife or cake leveller, trim the top of the cake so that it is level. Turn the cake upside down and cut it either in half, or into three, depending on how much filling you want. Secure the trimmed side to your smaller cake board with a little buttercream. Place the smaller board, with the cake, onto the larger board (I put a thin, small non slip mat between them. This stops the smaller board moving around when you are icing it).
- Add your filling to your cake, and give the outside of the cake a thin, even layer of buttercream with your palette knife. This is known as a ‘crumb coat’ because it basically seals in all the crumbs. Ensure that this is as smooth as possible, as any lumps will be seen through the sugarpaste. I use a sharp edged icing scraper around the sides and use my palette knife on top. You can also use a dough slicer. Put this back into the fridge until the buttercream is hard. I usually leave mine for a few hours and use the time to make decorations for the cake.
- Once the buttercream is hard, take the cake out of the fridge. Measure the width of the top of the cake, and the height with your measuring tape/ruler. This lets you know how much sugarpaste you will need (for example, if you have an 8 inch cake that is 3 inches tall, you add together the 8 for the width, and 3 for each side, giving you 14 inches).
- Brush a thin layer of water onto the top and sides of your cake. This ensures that the sugarpaste will stick to the buttercream. Make sure you don’t put too much though, as it can affect the sugarpaste.
- Remove your sugarpaste from its packaging and knead it until it is soft and pliable. Lightly dust your work surface with icing sugar. Using a large rolling pin, roll the sugarpaste out (ensuring it doesn’t stick to your work surface) until it is roughly 3-5mm thick. Measure the sugarpaste and make sure you have enough to cover your cake (for the example above, you would make sure you have 14 inches width and height). It is always better to have too much than not enough.
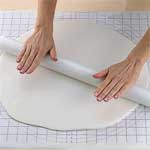
- Once you have your sugarpaste to the correct thickness, roll it over your rolling pin and then drape it over your cake.

- Using one of your smoothers, smooth the top to ensure there are no air bubbles. Then, using your hands, gently smooth around the edge of the cake and down the sides. If there are any folds in the icing, gently open them out and smooth them with your hands. Once the folds are gone, use your smoothers (one on top of the cake and one around the sides). This means the sugarpaste will be smooth and it won’t have any fingerprints on it!
- If there are any air bubbles, use a small pin to pierce them and then smooth them out again.
- Using your sharp knife/pizza cutter, trim the edges where the sugarpaste meets the larger board. If you’re feeling more confident, you can balance the cake on top of something smaller and trim the edges that way. Once the sugarpaste has hardened a little, you can add decorations to it.
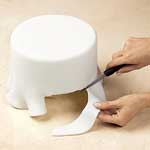

(These pictures show a polystyrene dummy as opposed to a cake, that’s why there is no larger board underneath
My Tips
- Always turn your cake upside down once it has been trimmed and cut. This means the side that was touching the bottom of cake tin will be the top of your cake. This ensures it is always smooth and level.
- Once your cake has been cut, secure the new bottom (the side you have trimmed) to your smaller cake board with a small amount of buttercream. This stops it sliding around.
- When you place the smaller cake board on top of the larger cake board, put a thin non slip mat between them (small enough that it does not peek out the sides). This stops the smaller board moving around when you are icing it.
- ALWAYS make sure your sugarpaste is at room temperature, and ALWAYS knead it before you use it. Sugarpaste can be very temperamental, especially when it comes to temperature. If it has not been kneaded enough, it will not be pliable enough and this can cause tearing and can lead to your cake looking like it has been covered in ‘elephant skin’.
- Only take the sugarpaste out of its packaging when you are ready to use it. NEVER leave sugarpaste lying out uncovered as it hardens very quickly and then becomes useless. Always keep it sealed in a bag.
- Make sure you have a measuring tape or ruler handy, to measure how much sugarpaste you need.
- Always brush a small amount of water onto your buttercream just before you cover it. This ensures the sugarpaste will stick.
- Don’t use any icing sugar when you are kneading your sugarpaste as it just dries it out.
- When you are rolling out the sugarpaste, ensure there is always a very thin layer of icing sugar on your work surface to stop it sticking. Turn the sugarpaste around after every couple of rolls, this means there is less chance it will stick to your worktop.
- Make sure you have a few small pins handy, in case you need to pop any air bubbles.
- The most important thing is making sure you are using a type of sugarpaste you feel comfortable with. There are loads to choose from and no two cake decorators will agree on every type available. If you can, buy some small samples of different types of sugarpaste and see which best suits your needs. Make sure you note the colour, flavour and texture to see if it’s suitable for you.
Good luck if you are covering your first cake and let us know how you got on! x